


Ever think about turning your home into a safe space that still looks great for your pet? Picture spending a weekend making a sturdy dog gate or even building a little crate that works as a piece of furniture.
This guide is filled with easy DIY projects that walk you through every step, list fun materials, and include budget-friendly ideas. Each project mixes practicality with a warm, inviting feel, so soon you’ll have a cozy nook that shows off both your care for your furry friend and your own personal style.
DIY projects for a pet-friendly environment: Cozy Living
This section is all about hands-on fun projects to turn your home into a safe and stylish haven for your pets. We’ve put together 10 creative DIY ideas that combine practical tips with charming designs. Each project comes with clear, step-by-step directions, a list of materials, cost ideas, and plenty of design suggestions.
Up next, imagine building a cute dog gate. Picture yourself crafting a gate from pine boards or metal panels that fits perfectly in your doorway. You’ll measure carefully, cut to size, smooth the edges with a gentle sanding, and finish with non-toxic paint. The estimated cost is about $25 to $75.
- Build a decorative dog gate
- Create a custom wooden crate with secure latches and a removable cushion that doubles as a nice piece of furniture
- Construct an elevated feeding station using a sturdy board, adjustable legs, and non-slip features
- Install a wall-mounted organizer to keep leashes, treats, and toys neatly stored
- Fabricate ramps and freestanding barriers so your pets can move around indoors with ease
- Assemble a fun pet agility course with jumps, tunnels, and weave poles
- Design a charming doghouse that matches your home’s style for extra appeal
- Give your space an eco-friendly makeover with reclaimed materials and low-VOC finishes
- Make safety upgrades to suit the needs of every pet
- Add butterfly-friendly landscaping to create a little natural retreat
Each project is laid out with simple steps, making it easy to mix practicality with a welcoming look. So, roll up your sleeves and get ready to create a pet-friendly home that feels warm and perfectly tailored for your furry family.
DIY Pet-Friendly Dog Gate Installation
Start by checking out our easy-to-follow guide for picking materials and taking measurements. When you're ready to add your own creative twist, consider mixing in some different wood treatments. For example, after you apply non-toxic paint, top it off with a pet-safe clear wood sealant. Imagine a shiny, protective layer that not only guards the wood against weather but also gives it a warm, polished look, almost like a freshly bitten apple!
If things feel a little wobbly while you're installing, pause and double-check where the hinges are placed. Tighten those screws until the gate feels as sturdy as your pet’s favorite resting spot, a reliable branch that never wavers, no matter how much your fur baby pushes or pulls. Even adding an extra screw or bracket at the bottom can make all the difference.
For extra flair, why not get creative with the design? You could carve gentle, decorative patterns into the wood or even mix pine boards with metal panels. These choices create a charming blend of rustic and modern styles. Just be sure that every edge is smooth and rounded, keeping your pet safe and happy.
- Grab a tape measure to carefully confirm your dimensions before you start cutting.
- Smooth out any rough, sharp edges with a good sanding.
- Give the gate a firm push and pull to be sure it's as stable as can be.
Every step is designed to help you create a stylish, secure space that feels as warm and welcoming as your home. Enjoy the process and let your imagination run wild!
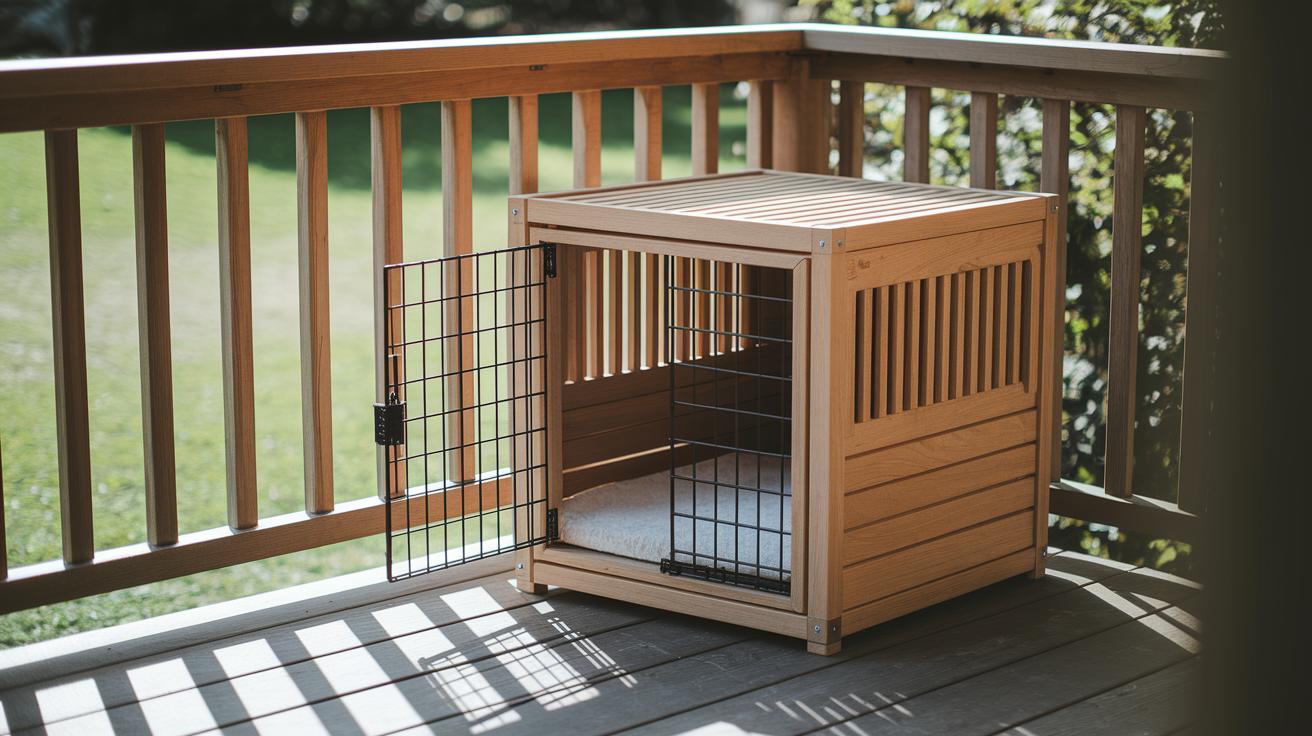
DIY Pet-Friendly Custom Crate and Shelter Construction
Before you start, measure your pet’s size carefully, think about leaving enough space for a cozy bed and plenty of wiggle room. Use sturdy ¾″ plywood for the panels and gather a measuring tape, saw, drill, and wood screws. Oh, and be sure to pre-drill the wood so you avoid splitting and keep everything strong.
Cut the plywood into panels that fit your pet perfectly. For a medium-sized dog, you might find that panels around 24″ by 18″ work well. Once you have your panels, pre-drill and fasten them together with wood screws to form a reliable frame. Next, attach metal mesh along the sides and add a few extra small holes to allow air to flow in easily, keeping your pet cool and comfortable.
Then, add a removable foam cushion inside for a soft, inviting bed. You could also install a secure latch on one side so that your pet can move in and out safely. And for a fun finishing touch, style the front panel to double as a side table, perfect for blending your pet’s space with your home decor. Finally, apply a non-toxic stain or paint over the whole unit to give it a polished, pet-safe look.
| Material | Purpose |
|---|---|
| ¾″ plywood panels | Provides durable structure |
| Wood screws | Keeps panels securely joined |
| Metal mesh panels | Ensures proper ventilation |
| Foam padding | Creates a comfy bed |
| Secure latch | Allows safe entry and exit |
| Non-toxic stain or paint | Finishes the unit with a safe, stylish look |
DIY Pet-Friendly Elevated Feeding and Hydration Station

Start by picking a strong, sturdy board, maple works great, and cut it down to a 24″×8″ size. Picture the board, as smooth as a gently polished stone, just waiting to become your pet’s new feeding station. Next, carefully drill holes that are just the right size for your pet’s bowls. Imagine yourself measuring precisely and slowly drilling each one, creating a cozy spot for meals.
After the holes are done, spend some time sanding the board until every surface feels silky smooth, much like the soft purr of your favorite cat. Then, seal it with a food-safe varnish. This not only gives the board a lovely shine but also keeps it protected from spills and mess, ensuring mealtime stays as neat as a well-tended garden.
Now, attach adjustable legs or blocks underneath the board so the height lands between 6″ and 12″. Think of it like giving your pet the perfect dining table to help with comfortable eating and smooth digestion. Finally, add non-slip feet and rubber gaskets around where the bowls sit to keep everything in place during mealtime.
- Cut board to proper dimensions
- Drill bowl-sized holes
- Sand thoroughly
- Finish with food-safe varnish
- Secure adjustable legs
- Add non-slip feet and rubber gaskets
This simple, elevated design brings together style and functionality, turning mealtime into a safe, cozy, and enjoyable experience for your beloved pet.
DIY Pet-Friendly Wall-Mounted Organizer and Decor Solutions
Start by choosing a strong 1×12 pine board, about 24″ wide, that can handle all your pet’s gear. Mount the board to your wall using French cleats or sturdy anchors rated for around 30 lbs. This gives you a solid base that looks great and holds everything securely.
Next, add a few handy elements to the board:
- Four heavy-duty S-hooks to hang leashes and collars neatly.
- A 6″×8″ chalkboard panel where you can quickly write reminders or fun pet notes.
- An 8″ deep shelf with a guard rail to store your pet’s treat jar safely.
- A small dispenser for waste bags, making clean-up super easy.
- A row of pegs to keep your pet’s favorite toys close at hand.
Picture your wall turning into a smart, stylish storage station that simplifies your daily routine. For instance, imagine clipping your pet’s leash on a smooth S-hook while jotting down a note on the chalkboard, simple and effective.
Take your time sanding down all the edges and finish the project with lead-free products. With a materials cost of about $15–$30, you’ll have a practical and charming organizer that fits right into your pet-friendly home.
DIY Pet-Friendly Accessible Mobility: Ramps and Barrier Projects

If you’re thinking about a project to help your pet move around safely, start by planning a ramp that measures 2′×4′. Carefully cut your ¾″ plywood and use 2×4 supports to build a strong base. Then, add a non-slip adhesive strip to the ramp’s surface to help your pet keep a good grip. For extra guidance and security, attach side rails made from 1×2 lumber. Work slowly and use pet-safe glue on all joints, and make sure you round off every edge so there are no sharp spots.
Next, consider building a barrier for even more safety and flexibility. Make your barrier about 24″ high using extra plywood to create a freestanding panel. If you attach hinges, your barrier can also double as a room divider when needed. Always pre-drill holes before adding screws; this not only keeps the structure sturdy but also prevents the wood from splitting. Check each step carefully so nothing wobbles and risks causing an accident.
| Project Type | Key Materials | Estimated Cost |
|---|---|---|
| Ramp | Plywood, 2×4, non-slip adhesive | $30–$60 |
| Barrier | Plywood, hinges, feet | $20–$40 |
- Measure twice before making any cuts.
- Always pre-drill holes to keep the wood intact.
- Use glue that’s safe for your pet.
- Round off any sharp edges for extra safety.
By following these handy steps, you’ll create a ramp and barrier that are as secure as they are pet-friendly, a perfect DIY project for any devoted pet parent.
DIY Pet-Friendly Interactive Play Structures and Climbing Walls
Imagine crafting a special play area where your furry pal can run, climb, and have a blast. Start off by building an agility course with sturdy yet eye-catching PVC joint jumps. Picture a 3-foot tunnel made of corrugated plastic, twisting like a secret castle passage that beckons your pet to dash through. Add in some 1-inch PVC weave poles, spaced every 18 inches, so your pet can zigzag around them with ease. And, for an extra touch of fun, include a seesaw plank made from a 2×6 board that tilts playfully as your pet bounds along.
Next, mix in some climbing wall features for a different kind of adventure. Secure 12″×6″ plywood steps every 12 inches along a safe section of your wall using heavy-duty L-brackets. This setup not only gets your pet moving but also mimics the thrill of scaling natural obstacles. Wrap the posts with sisal rope to offer extra grip and texture, making each step feel like a mini mountain climb.
The best part? You can build these interactive elements for about $50 to $100. It’s an affordable way to keep your pet both physically active and mentally engaged.
Safety comes first in your DIY project:
| Safety Tips |
|---|
| Round off any sharp corners on obstacles. |
| Secure the structures to the wall or floor. |
| Use non-toxic paints and sealers. |
| Place ½″ foam mats underneath for a soft landing. |
| Ensure stability by testing with a 50 lb load. |
Every piece of this play structure is adjustable, meaning you can tweak it as your pet grows or its play style changes. Imagine your pet happily exploring each challenge, tail wagging with joy, and feeling completely safe in their new adventure zone.
DIY Pet-Friendly Cat Modifications and Climbing Solutions

Imagine crafting a cozy little playground just for your cat, where smart design meets playful charm. First, picture a wall path with secure shelves set about 12 inches apart. Each shelf becomes a perfect lookout or resting spot, where your cat can survey its little kingdom. Use sturdy ¾-inch plywood and heavy-duty brackets to keep things safe, even when your furry friend makes an energetic leap.
Next, add vertical posts wrapped in sisal rope that work as both scratching posts and fun climbing aides. Secure these posts firmly to the wall or integrate them with the shelves using pet-safe adhesives for extra stability. For an extra touch of comfort, install cushioned perches made with 2-inch foam and covered with fabric that you can easily wash. Imagine your cat curling up on a soft perch after a lively climb, much like finding a warm, sunny spot in the house.
| Step | Tip |
|---|---|
| Measure Wall | Carefully measure your space to ensure the shelves are evenly spaced. |
| Pre-Drill Plywood | Pre-drill holes to avoid splitting the wood. |
| Wrap Posts | Use sisal rope and wrap tightly for a firm grip. |
| Attach Cushioned Perches | Secure them well to prevent any unwanted shifts. |
And here’s a fun fact: "Before modern designs, vertical spaces for cats were hidden treasures, like secret playgrounds just waiting to be explored." This project is an affordable upgrade, with an estimated cost of $20–$60 per unit, blending safety, comfort, and creative flair perfectly for your furry companion.
DIY Pet-Friendly Eco-Material Upgrades for Sustainable Living
Imagine using reclaimed wood instead of buying new lumber to give your pet projects a warm, natural touch. Picture those charming pieces of weathered pine transforming into a sturdy shelf for your cat’s favorite perch or a snug little bed for your pup. Not only can you cut material costs by 30–60%, but you’re also saving wood from ending up in a landfill.
Why stick with regular paint when you can choose a water-based, low-VOC option like non-toxic milk-based paint? This kind of finish feels soft and fresh and keeps your furry friend safe from harsh chemicals. And for an extra fun twist, try turning old fabrics into washable pet beds. Imagine the cozy comfort of recycled denim cushions adding a unique, personal flair to your DIY project.
Here are some eco-friendly material ideas to consider:
| Material | Use |
|---|---|
| Reclaimed pine | Furniture frames |
| Non-toxic milk-based paint | Safe finishes |
| Recycled denim | Cushion covers |
| Biodegradable sisal rope | Scratching posts |
These simple upgrades not only lighten the load on our environment but add a stylish, pet-friendly charm to your home. Plus, when you shop around, you might find reclaimed wood for free or up to $20 and quality non-toxic paint for around $15–$30 per gallon. Every little choice helps create a safe, sustainable space that you and your pet can truly enjoy.
For more friendly tips on choosing recycled and safe materials, check out environmentally sustainable practices for outdoor pet care.
DIY Pet-Friendly Outdoor Landscaping and Retreat Spaces
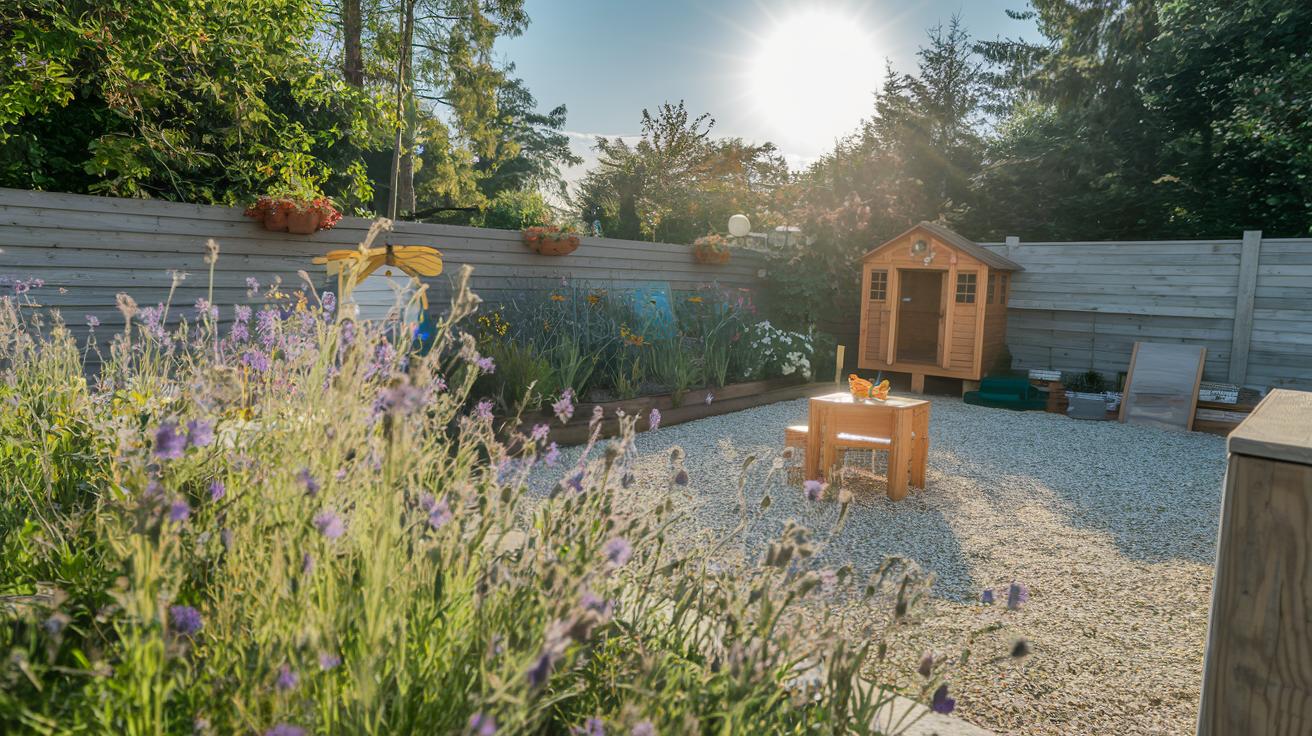
Ever thought about converting your backyard into a cozy, pet-approved getaway? Start with a simple plan that blends native plants and dedicated play spots. For example, design small 2-foot-wide garden beds filled with wildflowers like milkweed and coneflower. These little blooms draw in butterflies and other friendly pollinators, and choosing pet-safe varieties keeps your fur babies happy and protected.
Next, why not build a charming little wooden butterfly house using cedar scraps? It’s a fun DIY project that only costs about $15–$30 and offers a snug shelter for visiting insects, adding a special touch to your yard. Close by, set aside a 10×10-foot gravel play zone bordered with low cedar logs. This area gives your pets a safe, easy-to-clean spot to dash around while rounded river rocks replace harsh mulch for extra comfort.
As you craft your retreat, mix lively zones for play with peaceful nooks for rest. Create winding walkways between the garden beds and play areas so your pet can explore safely. Consider adding a pergola or canopy over a seating spot to give both you and your furry friend a cool, shaded retreat on hot days.
Safety should always come first. Here are a few tips to keep in mind:
- Check that your plants aren’t on the ASPCA toxic list.
- Use smooth, rounded river rocks instead of regular mulch.
- Provide plenty of shade with a pergola or canopy.
Every part of your design should focus on pet safety and easy upkeep. By blending local landscaping with your personal DIY flair, you’re not just building a yard, you’re creating a lively haven where style meets fun. Enjoy every step of the journey and watch your outdoor space transform into a natural retreat where your pet’s joy and your own creativity shine together.
Final Words
In the action, the article walked through hands-on steps to build a pet-friendly home with playful dog gates, custom crates, elevated feeders, and even eco-friendly upgrades. It detailed safe wall organizers, ramps, interactive play areas, clever cat climbs, and inviting outdoor retreats. Each project came with clear instructions and cost tips, making DIY projects for a pet-friendly environment accessible to every pet lover. These simple projects aim to boost both your pet’s safety and style, leaving you feeling optimistic and ready to create a cozy haven for your furry friend.
FAQ
How to create a pet friendly garden that’s safe and enjoyable?
Creating a pet friendly garden that’s safe and enjoyable means selecting non-toxic plants, secure fencing, and pet-safe features that allow your furry friend to explore and play without risk.
Is Hobby Lobby a pet friendly place?
Determining if Hobby Lobby is pet friendly depends on each store’s policy, though most locations restrict pets. It’s best to call ahead if you plan to visit with your pet.
What is the most environmentally friendly pet?
Choosing the most environmentally friendly pet often means opting for animals with smaller ecological footprints, such as cats or small rodents, which generally require fewer resources and less space.
How to make a pet friendly home?
Making a pet friendly home means integrating safe design choices like secure gates, non-toxic finishes, and easy-to-clean surfaces that keep your pet comfortable while enhancing your living space.